
Managing and Linking Files
To include a document or image in your profile, you will first need to uplaod the file. You may upload files (.doc, .docx, .pdf, .jpg) into the Employee Database.
Uploaded files do not automatically appear in faculty details pages. Documents must be linked to text and images must be inserted within a content area.
Managing Files
Uploading Files
Before uploading files, please rename in a way that follows recommended naming conventions.
Please resize images to 72 ppi and dimensions of less than 800 x 400 (or 400 x 800) pixels.
Steps for uploading a file:
- Select "Manage Faculty Files" from the options list.
- The window that opens will include a list of previously uploaded files.
- Click the Choose File button.
- Browse to the file on your computer, and select the document you wish to upload.
- Click the Upload File button. The uploaded file will appear in the file list.
- To exit the window and go back to your profile, click the "X" in the top right-hand corner of the window.
Deleting Files
To permanently delete files, click "Delete" next to the file you wish to remove from the list.
Note: Please remove old and unused or outdated files periodically.
Linking a Document File
To link a file to text within a field:
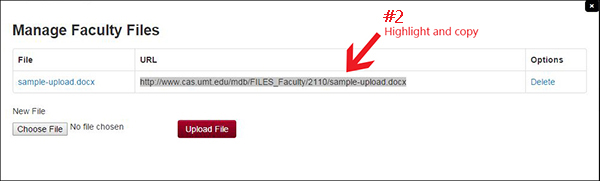
- Select Manage Faculty Files from the options list.
- In the file list, copy the URL for the file you wish to link.
- Go to the field that contains the text to which you wish to link the file.
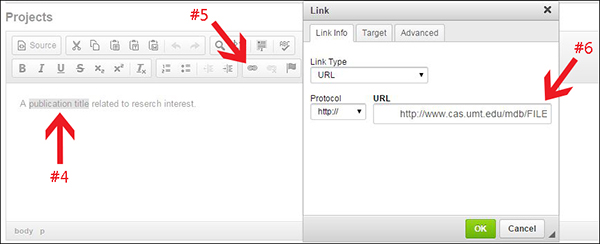
- Highlight the text (*title) that will serve as the link.
- Select the link icon (linked chain) in the editing tools.
- In the window that opens, paste the URL into the URL field. Select http:// in the Protocol dropdown menu. The system should strip off the http:// from the URL you pasted in, but you may want to check to make sure it is not being repeated.
- Click OK.
- On your profile page, click the large red Save Changes button.
*To best meet accessibility standards, link the title of the publication rather than to text that reads "Download PDF", which will not provide title information to a screen reader user.
Inserting an Image into a Content Area
Before uploading an image, resize to 72 ppi and dimensions of less than 800 x 400 (or 400 x 800) pixels. Many images can be smaller than this.
To insert an image into a content area:
- Select Manage Faculty Files from the options list.
- In the file list, copy the URL for the image you wish to insert into a content area. (See above.)
- Go to the field where you wish to place the image.
- Place your curser where you would like the image to be.
- Select the image icon (picture of mountains) in the editing tools.
- In the window that opens, paste the URL into the URL field. Add alternative Text (Breif description that contextualizing the image). (You should see a preview of your image.)
- You can also check the size of your image here and resize as needed (make sure the lock icon in locked to retain the aspect ratio).
- Click OK.
- On your profile page, click the large red Save Changes button.
If this process does not work, it is mostly likely because your image is either too large or in a file type that the system does not accept.